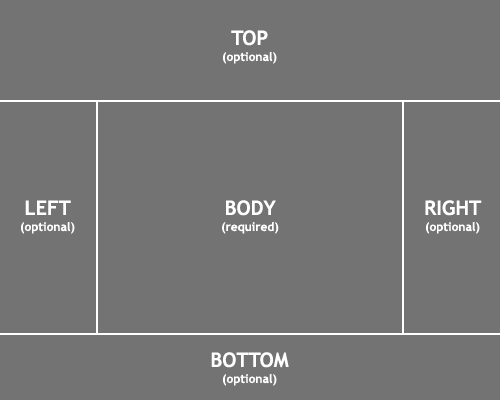
| Here are some important fundamental concepts in working with the HyperSites™ tools. If we missed something, let us know. | | | | | |  | Areas are the largest building blocks of the site. Area width can be specified, and the height automatically adjusts to accommodate the content within.
Body Area
The body area is required, and every page has its own. A page can have multiple body areas, but only one can be displayed at a time.
Top, Bottom, Left, and Right Areas
These areas are all optional. A single set of them can be shared by the entire site, or you can create as many as you want and set a page or pages to use them. Typically, you'll have a set that is used site-wide and overridden where needed. |
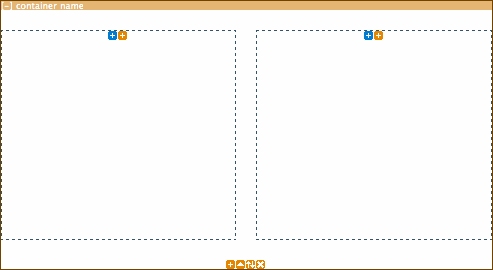
| | | | Above is an example of a general container. General containers set up the space that content goes in. You can control the width of the container and create multiple columns, both at widths specified in percentages or pixels. Like areas, containers expand vertically to accommodate content. A minimum height can be specified. Space between the columns and around them can be set as well.
Containers can be nested inside a column of another container to create additional structure. The example above shows a two-column container with space between, above, and below (indicated by the dashed blue lines). |
| | | | There are numerous types of content that can go inside containers, from text and images to video, flash, and more. Content is also used to add nested containers. |
|
|
|
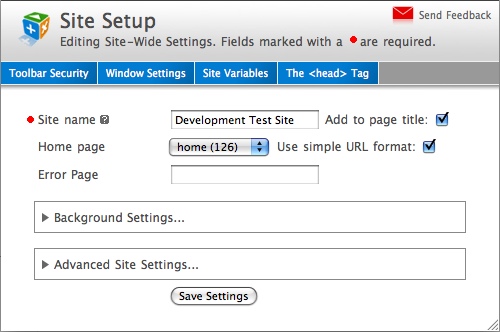
| | | | | | The Site Name was set when you created your site. You can change it here, and choose whether or not to have it included in the title bar of every page. If you add it to the page title, the title becomes [site name] - [title]. Otherwise it will just be [title] (title is set in Page Setup).
Background Color and Background Image control what exists behind the areas, and are set in the "Background Settings..." pane. Choose a color from those you have created, or upload an image. Images get repeated automatically, starting from the upper left of the window (no repeat and alignment control is coming soon).
Home Page is where you select the default page loaded when someone goes to your site.
Error Page is where you specify what page you want to load if someone goes to a bad URL (web address) at your site. The specified page will load instead of the default '404 Page Not Found' error page. Enter the page using the pg1234.html format. Page ID numbers can be found in the Site Map.
Clicking the 'Save Settings' button will commit any changes you've made, and refresh the main page. |
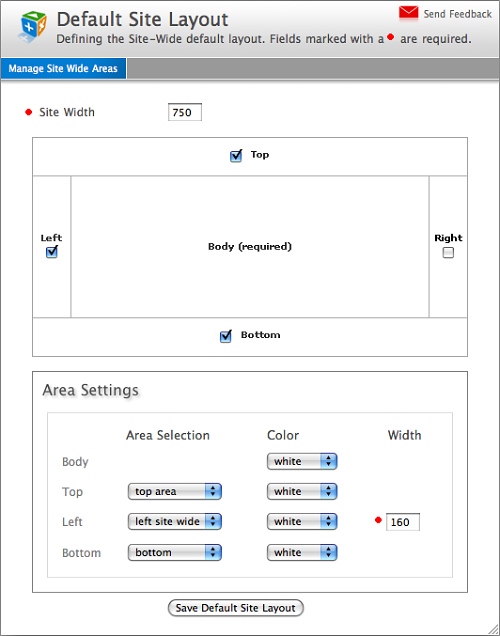
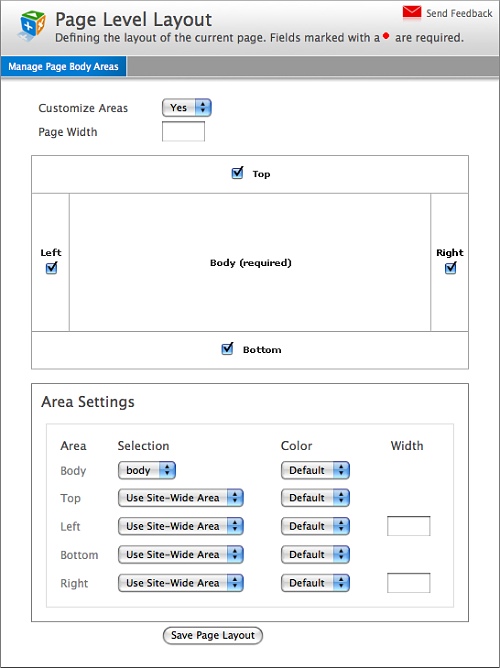
| | | | The Default Site Layout window shown above is found at Toolbar > Site Tools > Layout. Here you can activate and choose the default areas used throughout your site. You can also choose the default background color for each area and set the default site width. All of these settings can be overridden at the page level in Toolbar > This Page > Layout.
Click the check-boxes in the diagram at top to activate or deactivate an area. The page will refresh allowing you to choose which area and background color is used for each activated area. For the right and left areas, a width field will show as well. The body width is automatically calculated and is the site width minus the width of the left and right areas.
The site width can be specified in pixels or by percentage. |
| | | All of the settings in the Default Site Layout can be overridden for a specific page by using the Page Layout window. You can find it in Toolbar > This Page > Page Layout.
|
|
|
|
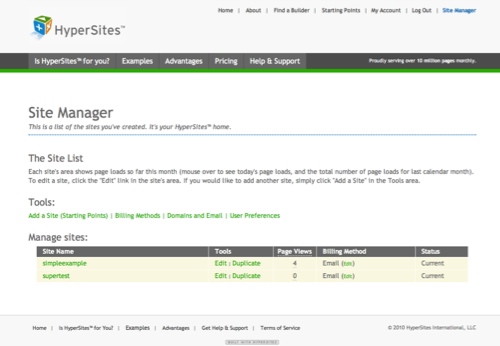
| | | | | The Site Manager is where you see all of the sites you have, manage their settings, and create additional sites.
Adding a Site
By clicking "Add a Site" in the Tools section, you'll be taken to a page that lists the currently active Starting Points. Simply click "Select" under the Starting Point you want to use. Once the new site is created, it will appear in your Site Manager.
Editing Your Sites
To edit any of the sites in your Site Manager, click the "Edit" link in the Tools column under Manage sites. The site will be opened in a new window with admin tools showing.
Billing Methods
We offer a few different options for payment for your HyperSites services:
- Email - By default, all sites are set to Email, which means that you'll receive an email at the beginning of the month if any of your sites have surpassed the 1,000 page view goal. The email will contain a link back to your Site Manager that will enable you to pay for your services.
- Credit Card - You can pay for your services with all major credit cards. If you'd like, you can save your credit card information, and we'll automatically process your balance at the beginning of the next month. You can create and save multiple billing methods for each of your clients.
- Invoice - At beginning of the month, the recipient of the invoice will get an email with a PDF attached. Since this option requires manual labor, a $5 service fee is attached to each site using this method.
Page Views
This shows the number of page loads for today, the current month-to-date, and total for last month. This is helpful for getting an idea of upcoming page view charges. The default display shows only today's page views. If you mouse over the number, you will see the historical numbers.
Domains and Email
With the Domain Name Manager, you will be able to enter domain names for which you've pointed to services at HyperSites. For each domain you enter, you can enable email services, then create email addresses, manage passwords, etc. |
|
|
|
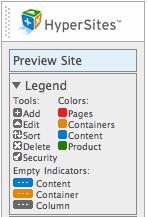
| | | | | | When logged in as an admin, you can see the above legend if you click the "Legend" label. You'll also see these tools inline throughout the page. The actions (add, edit, sort, delete, and security) in combination with context colors (gray, red, orange, blue, purple, and green) indicate the action you're applying to what type of object. For example, to add (+) content (blue), click a blue plus.
When adding objects, click the plus where you would like it to appear. Don't worry if it doesn't go where you intended, it can be sorted (arrows) or moved via its setup window.
For editing objects, click the triangle tool appearing directly below what you want to affect. Sort, delete, and security work the same way. |
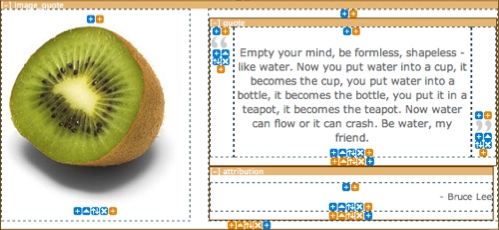
| | | | The above image shows gray borders surrounding an area, orange borders around containers, and dashed blue borders for content. Dashed lines are used to indicate spacing and column divisions.
The image shows an area named "body" with space set at left (gray dashes). The first container called "image_quote" has two columns indicated by the blue dashed boxes. There is space between them. Content resides within the container columns. The two containers, "quote" and "attribution," are nested within the "image_quote" container.
The [-] next to the area and container names can be clicked to hide everything within it. Once clicked, only the title bar of the area or container will show with a [+] next to the name, which reveals the contents when clicked. This is handy for speeding refreshes by hiding objects you're not working with. |
|
|
|
| | | | | HyperSites has three experience levels: Beginner, Intermediate, and Advanced. When your account is first created, you are placed at the Beginner level.
The available levels are: |
| | | • | Beginner - Simple functions to help learn quickly. Great for brochure sites. | | | • | Intermediate - Users, E-Commerce, advanced Database features. | | | • | Advanced - Everything needed to build complex web applications. |
|
| | | | In Setup windows you'll notice a blue bar across the top indicating that additional features are available. This is a Workflow Container, for example, as seen by the Beginner user level. |
| | | | If you place your mouse cursor in the blue box, a new pane will show with a brief overview of the additional features you will have access to at the different user levels. |
| | | | To change your experience level, you can click the link provided in the Setup Window, choose "Toolbar > My Settings..." in the HyperSites Toolbar, or click "User Preferences" in your Site Manager at HyperSites.com. |
|
|
|
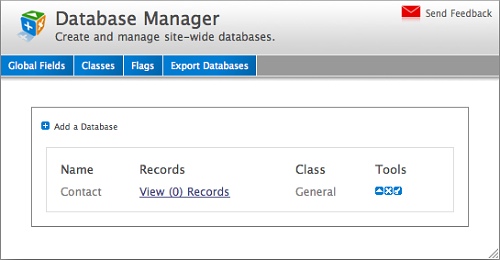
| | | | The Database Manager
Our concept of databases (the more advanced user may recognize them as tables) is straight forward. You create databases, define fields, then input data into the databases using forms we create based on the fields you have defined.
To access the database manager go to Toolbar > Databases > Database Manager. |
| | | The Database Manager is a list of the databases you have created. It shows the name, number of records, the class (or group) and edit tools for each.
To add a new database, click the blue plus. To edit the fields and other settings for a given database, click the blue triangle. |
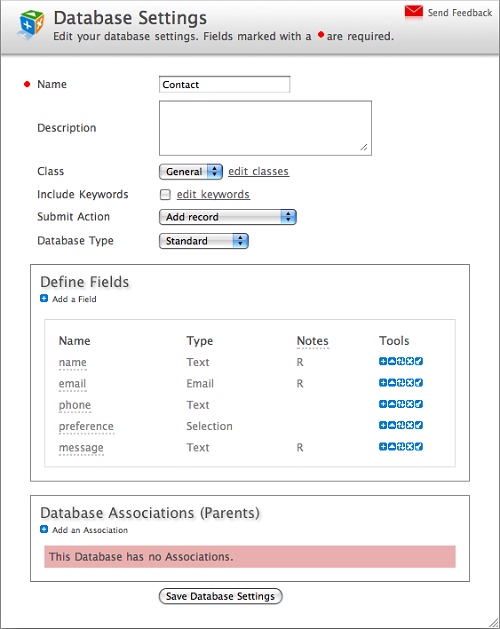
| | | The Database Settings window is used to describe the database and to manage fields and associations to other databases.
This window shows settings for the default database "Contact" and lists the fields that make up the database.
To add a new field, click the blue plus in the "Define Fields" list. To edit a field, click the blue triangle next to the field you want to edit.
Additionally, you can change the order of the fields when displayed in a form, and you can set security on the fields to determine which users can see them. |
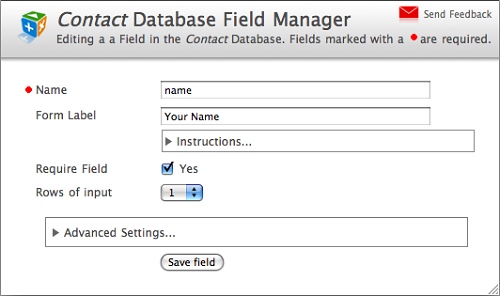
| | | The Database Field Manager is used to manage the properties of the fields in your database.
If you're adding a field, you'll have an option not shown here which is the field type. These include text, image, date, number, and many others.
Every field type has settings specific to that type. In this example, the text field has "Rows of input." Rows of Input is how many rows the field will have when it is displayed in the form. |
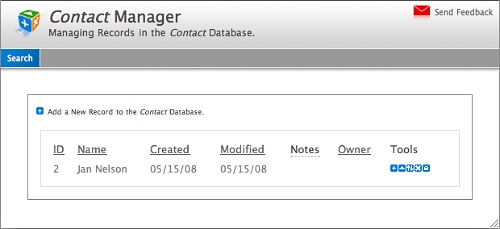
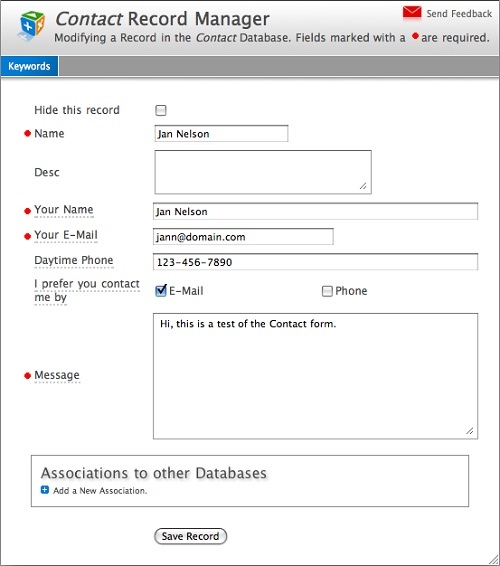
| | | To view a list of the records in your database, or to create new records, click "View Records" next to the database in the database manager. In this example, we're using the default database named "Contact."
To add a new record to the database, click the blue plus. To edit a record in the list, click the blue triangle. |
| | | As you can see, when adding or editing records in the record manager, we've built a custom form for you to enter data. It uses the fields you created in the database settings window. |
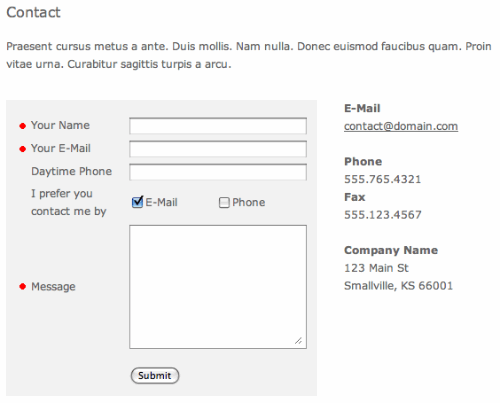
| | | | Using the workflow container, you can embed forms from the database manager into your site to collect data from your users. The possibilities are endless once you understand these tools! Have a look at the Contact page in the Simple One Starting Point to see how it is done. |
| |
|
|
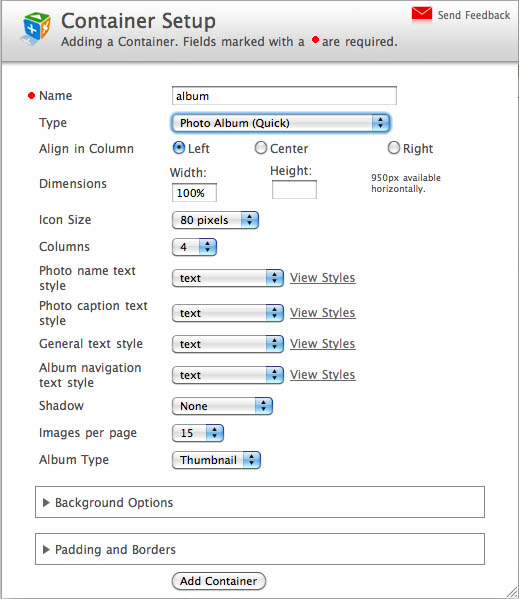
| | | | | To create a quick photo album, create a container and name it. Select "Photo Album (Quick)" from the drop down. Other fields you may want to address at this time are "Icon size," "Columns," "Images per page," and "Album type." |
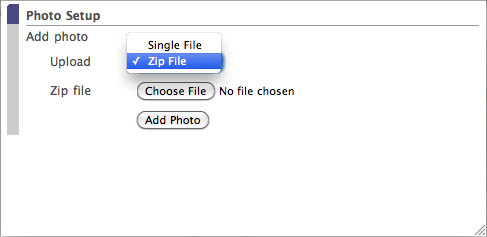
| | | | After the container is created, click on the grey "+" at the top. You will have the option of uploading individual pictures, or a zip file of pictures. Click on "Add Photo," and your album is dynamically created. |
| | | | And there you have a simple photo album! |
|
|
|
| | | | Normally I'd say "sit down, strap yourself in, and get ready for a ride," but this is actually rather simple.
Let's use an account hosted at Godaddy as our example.
Log into the Godaddy account and find your way to the DNS Manager. Godaddy seems to change their interface pretty often, so it will be something similar to this on the relevant domain... My Account > Advanced Details > ("Launch") DNS Manager. You should be at a page that looks like this on the top... |
| | | Change the ip address under A (Host) in the "points to" section to 174.136.23.44 and save. We are now done with Godaddy. |
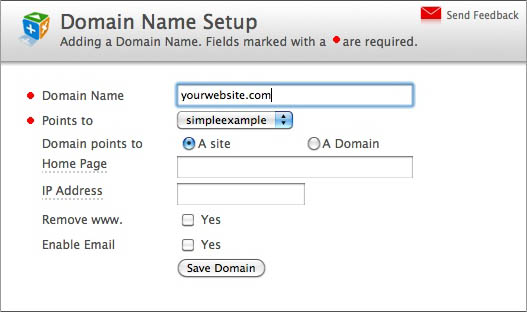
| | | Log into your Hypersites™ account and click on "Domains and Email" in your Site Manager.
Click on add a new domain.
Enter your domain name. If you have more than one site in this account, select the relevant one in the "Points to" section. Save your selection. |
| | | | And that's it. After your hosting company updates (usually about an hour), you will be good to go! |
|
|
|
| | | | Prerequisite: Working with databases
NOTE: RSS feeds are database driven... Meaning, just changing text on a page will not trigger an update. It will require an update to the referenced database. |
| | | The first thing we will need is a database. I have created one called "RSSUpdate" for this example. |
| | | Next, we will need a feed. The "Feed" interface is located under "Databases" in the tool bar. |
| | |
After opening the "Feeds" dialogue box, click on the blue "plus" to add a Feed. |
| | Now, fill in the required fields...
Type of Feed - Basic
Feed Name - This will show in your feed list.
Feed Title - This will show in the heading of the RSS page.
Subtitle - This will display in the description section.
Site URL - The home page of your HyperSites™ address. (http://simpleexample.hypersites.com/Home.html) |
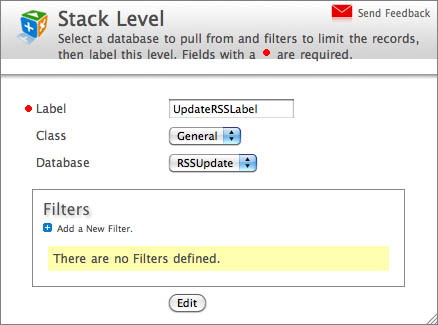
| | | Scroll down, and you will see the "Stack Level" box. Add a new Stack Level.
Label - Name it.
Class & Database - Choose the relevant of each for the database you want to reference. |
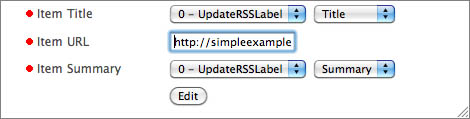
| | | Continue below the Stack Levels box...
"Item Title" & "Item Summary" are what will show in your RSS feed page. Choose the field you want to show for each from drop down on the right. (Drop down choices are pulled from referenced database.)
Item URL - The page that you want the user to link to from the RSS feed. |
| | |
Before exiting the Feeds interface, make note of the path given where the .xml file resides... |
| | |
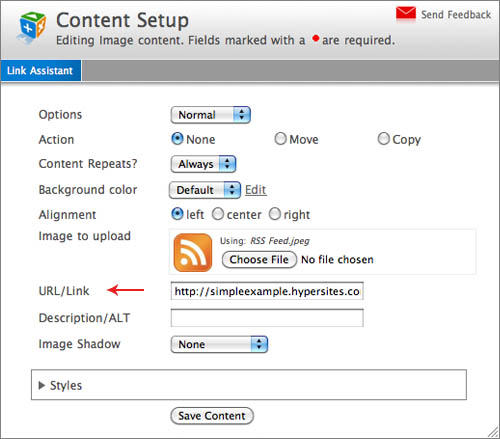
We now move to the container (and content holder) where you want the RSS feed to reside.
Upload the image of your choice...
URL/Link - Insert the root address of your account, and then the extension you made note of earlier. (http://simpleexample.hypersites.com/site/xml/rss/UpdatesRSSFeedName.xml) |
| | |
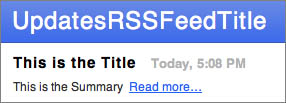
You should now have a functioning RSS feed link! |
| |
|
|
|
|
| | |
|
|
|